

How To Change A Heating Element On A Speed Queen Dryer
Introduction
Supervene upon heating element, belt, complete teardown on a Speed Queen (Alliance) electric dryer.
-
-
1) Unplug the dryer!
-
two) Tip the dryer onto its back and remove the panel beneath the door by removing the two screws in the lower corners.
-
-
-
three) At this signal you can meet the heating element in the dorsum lower left corner. Brand careful note of where the 3 harness wires connect. (Make a diagram or accept a motion picture!)
-
If needed, the electrical schematic can exist plant in the infinite behind the command knobs.
-
Remove the 2 screws on the back of the plastic bezel on summit of the controls. A hole will allow y'all to become a hold of the schematic taped to the bottom of the compartment.
-
-
-
iv) Remove the iii wires (one 12ga blackness, one 12ga orange, one 14ga bl/bk). Check the resistance across the heater terminals - information technology should exist around 10 ohms. Besides Cheque for burned connectors.
-
-
-
5) The heating chemical element can be removed past removing ii screws on the left and right edges of the element. Information technology volition slip right out.
-
Remove the cycling thermostat and limit thermostat from the old element and place on the new one.
-
If replacing the heating chemical element, you are done. Reassemble.
-
-
-
Remove the 2 screws securing the lower edges of the door assembly.
-
Rotate the lower edge up.
-
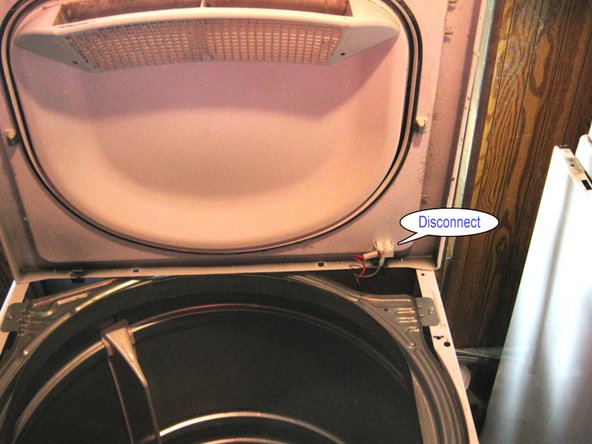
The door switch is at the upper right corner of the associates and must be disconnected from the switch to completely complimentary the door assembly. The wires become to connectors 1 (mutual) and 3 (NO).
-
Note: A bad door switch will prevent dryer operation.
-
-
-
The pulsate retainer plate is now exposed. Information technology can be removed past removing 4 screws effectually the edges and lifting it off.
-
Note the two tabs and slots nigh the lower screws.
-
-
-
The pulsate is next. Make a diagram of how the belt is arranged on the belt tensioner and motor caster. Attain behind the motor at the lower right and take the tension off the belt to remove the belt from the motor pulley.
-
At this indicate the belt can be replaced past slipping a new one over the drum and attaching it to the tensioner and belt caster.
-
Be very careful that the belt is not twisted and information technology is close to the wear track on the drum where it was running.
-
Turn the drum slowly by hand to ensure everything runs smoothly.
-
If replacing a belt, you lot are done. Reassemble.
-
-
-
Otherwise, remove ONE screw securing the top of the dryer to the sides to requite information technology a little vertical clearance on the drum and elevator the drum out.
-
The top of the dryer volition yet be attached by the wiring harness but can be fix bated far plenty to get admission for the next performance.
-
The back plate is now exposed. There 4 screws effectually the edges holding information technology in equally well equally two more than in the upper right corner securing the dryer ability cord concluding block and a footing wire.
-
In that location is also 1 connector going to the neutral on the power cord final block (brand sure you lot reconnect it to neutral!).
-
After all these are disconnected the back plate volition elevator out.
-


Conclusion
To reassemble your device, follow these instructions in reverse club.
Fastened Documents
Embed this guide
Choose a size and copy the lawmaking beneath to embed this guide as a minor widget on your site / forum.
Preview
Source: https://www.ifixit.com/Guide/Speed+Queen+AES17AWF+Heating+Element+and+Belt+Replacement/11671
Posted by: tobinmors1941.blogspot.com
0 Response to "How To Change A Heating Element On A Speed Queen Dryer"
Post a Comment